
·
BASICS
·

Marketing Lead
Introduction
Google’s NotebookLM launched its slides feature a while ago but most people still don't know about it.
The pitch is compelling: upload your research, your PDFs, your notes, your reports and NotebookLM reads everything, finds the most important ideas, and turns them into a polished, visually designed slide deck in under two minutes. No blank slide staring back at you. No formatting hell. Just a structured, source-accurate presentation that actually reflects what's in your documents.
For getting a strong first draft out of a pile of source material, it's a great resource.
But there's a catch and it's the reason you're probably here.
Once NotebookLM generates your slides, editing them is a different story entirely. Want to fix a typo? You're re-prompting the AI and waiting for the whole deck to regenerate. Want to change the font size? Same process. Want to move a single element two pixels to the left? Not possible. The slides NotebookLM produces are rendered as flat images - visually impressive, but fundamentally locked.
Google has been shipping updates fast. There's now a per-slide revision interface, direct PowerPoint export, and Gemini 3.1 Pro powering the generation. These are real improvements. But the core gap - the ability to click on an element and just change it remains closed.
This guide covers everything: how NotebookLM's slide feature works, what every recent update actually changes in practice, why manual editing still isn't possible inside the tool, and the workflow that solves it. Whether you want to make small design tweaks, apply brand fonts and colors, or export a file your whole team can edit in PowerPoint - by the end of this blog, you'll know exactly how to do it.
What Are NotebookLM Slides?
Google's NotebookLM started as an AI-powered research assistant designed to help you make sense of your own documents. Upload PDFs, Google Docs, websites, or notes, and NotebookLM gives you a Gemini-powered research partner that only draws from your sources - no hallucinated web content, no guessing.
In late 2024, Google added a headline feature to the Studio panel: Slide Deck generation. With a single click, NotebookLM can analyze everything in your notebook and output a polished, visually designed presentation - complete with layouts, icons, color themes, and structured content pulled directly from your sources.
Key fact: NotebookLM's slides are generated using Gemini and rendered via Google's Nano Banana Pro image generation model meaning each slide is essentially a high-resolution image, not a structured document with editable layers.
This is an important detail that shapes everything about how NotebookLM slides behave - both in terms of what looks great, and what becomes frustratingly hard to change.
What NotebookLM's slide feature does well:
Source-grounded content: Every slide is built entirely from your uploaded source of information - documents or links. No generic filler, no hallucinated facts.
Professionally styled: NotebookLM applies thoughtful visual design: color schemes, iconography, and layout hierarchy, automatically.
Instant generation: A full presentation deck is ready in seconds, structured around the most important themes in your sources.
Export options: Download your deck as a PDF or directly as a PowerPoint (.pptx) file.
How to Create a Slide Deck in NotebookLM
If you haven't created a slide deck in NotebookLM yet, here's how the process works:
Step 1: Upload your sources. Add PDFs, Google Docs, web links, YouTube videos, or plain text notes to your NotebookLM notebook. The more relevant content you add, the better the slides.
Step 2: Select "Slide Deck". Look for the Studio section in the right-hand sidebar of your notebook interface.Click on the Slide Deck option. NotebookLM will read your sources and begin generating a presentation. This typically takes 30–90 seconds depending on the volume of content.
Step 3: Review the generated deck NotebookLM will show you a preview of each slide inside the interface. You can scroll through the full deck before exporting.
Step 4: Make edits using AI. Add instructions on the edits you want to make for each slide and then click on ‘Generate new deck’ to create a revised deck with changes.
Step 5: Export your deck. Use the three-dot menu to download as PDF or PowerPoint once all edits are done.
What NotebookLM’s Slide Feature Does Well And Where It Falls Short
Before getting into how to edit NotebookLM decks, it's worth being clear about what the tool is actually good at:
Reads your sources carefully - it doesn't skim. It processes every document you upload and pulls out the ideas that actually matter.
Structures content intelligently - topics are grouped logically, slides follow a coherent narrative, and the flow makes sense without any input from you.
Stays grounded in your material - every claim on every slide comes from what you uploaded. No generic filler, no hallucinated facts.
Handles the hard content work fast - turning a 40-page research report or a messy pile of notes into a structured first-draft deck takes under two minutes.
Where it breaks down is everything that comes after.
Why editing NotebookLM slides is harder than it should be
NotebookLM's slides are rendered as flat images using Nano Banana Pro. Each slide is generated as a high-resolution picture, not as a structured file with independent text boxes, shapes, and elements. This means that once a slide is generated, there's no layer underneath it you can interact with. You can't click on the title and retype it. You can't drag an icon to a different position. You can't change a font or adjust a color without going back to the AI.
For big structural changes - "restructure the whole deck with a different color scheme" or "add a competitive analysis section", this is manageable. The AI handles it and regenerates a new deck. But for the kind of small, precise adjustments that happen at the end of every presentation workflow - fixing a word, matching a brand color, tightening a layout, it creates a frustrating loop of prompting, waiting, reviewing, and repeating.
Google has shipped real improvements to the editing experience since launch, and they're worth understanding before writing the tool off. But it's equally worth being clear about where the limits still sit.
What's changed in 2026: NotebookLM's slide updates explained
NotebookLM's slide feature has moved fast since its November 2025 launch. Here's every major update and what it actually means in practice.
NotebookLM Slide Editing: Prompt-Based Revisions
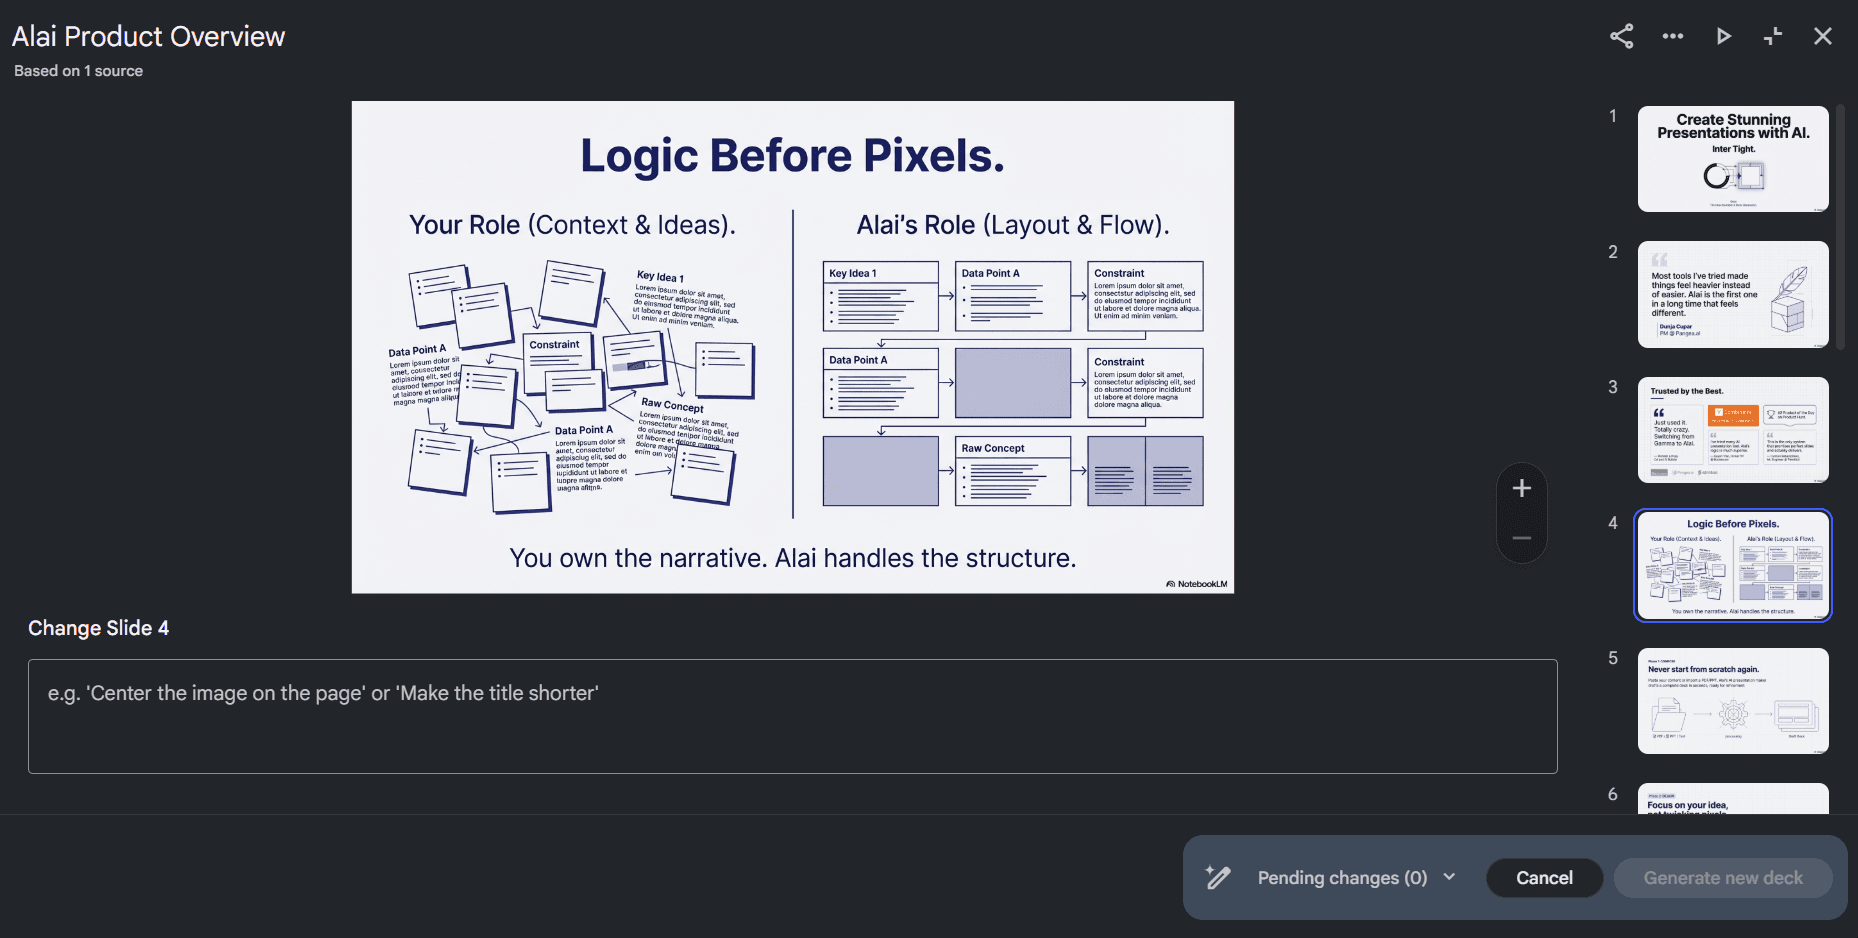
This is the most significant editing update NotebookLM has shipped. You can now open any existing deck in the Studio panel, click the pencil icon next to the title, and access a per-slide revision interface. Each slide gets its own prompt box where you can instruct the AI to edit text, change the visual layout, replace imagery, or adjust color. When you're done queuing changes, "Generate new deck" produces a revised version.
It's a real improvement over regenerating the entire deck blind. But it comes with notable limits Google's own documentation spells out: adding or removing slides is not yet supported, sources are not taken into account during revisions (only during initial generation), quota limits apply to the total number of revisions, and edits lead to regenerating the whole deck so making quick changes can still be time consuming
PowerPoint and PDF Export: Rolled Out to All Users
Both PDF and PPTX export are now available from the three-dot menu in the Studio panel. Google Slides export is confirmed to be coming, though no date has been announced.
Watermark Removal for Pro and Ultra Subscribers
Free users' exports now carry a visible Nano Banana Pro watermark. Google AI Pro and Ultra subscribers get watermark-free output, which is a meaningful difference for professional use. A visible AI watermark in a client or board presentation is a hard sell.
Gemini 3.1 Pro Upgrade
Now rolling out to Pro and Ultra subscribers, this brings stronger reasoning capabilities to the generation layer. In practice: more coherent narrative flow across a deck and better handling of technically dense source material.
Long Deck Option (Pro/Ultra)
Pro and Ultra users can now generate longer decks beyond the standard slide count limit, useful for researchers, educators, and consultants who need to cover substantial ground in a single presentation.
Why none of this solves the core problem
The updates above are genuinely useful, and if you're doing heavy structural editing through the AI, the experience is meaningfully better than it was six months ago. But there's a reason none of them close the gap that most users actually feel.
NotebookLM's slides aren't built like PowerPoint files. When the AI generates a slide, it uses Nano Banana Pro to produce a flat picture of a slide with no underlying structure of independent text boxes, shapes, or moveable elements. The visual layer and the content layer are the same thing.
This is why even the PPTX export doesn't give you a truly editable file. When you open it in PowerPoint, you're looking at image layers inside a PPTX container, not a document with selectable objects. Clicking a "text box" reveals a flat image. Nothing can be moved, resized, or retyped directly.
So the loop remains. Want to fix a typo? Prompt the AI, wait for the deck to regenerate, review every slide to check nothing shifted unexpectedly, and repeat if it's off. For something that should take five seconds, it can take five minutes. For professionals who need to apply brand fonts, hit specific design standards, or make targeted layout adjustments for a particular audience, this isn't a minor inconvenience. It's the thing that makes NotebookLM slides hard to use professionally.
That's what the rest of this guide is built around solving.
How to Edit NotebookLM Slides: Best Workarounds And How They Work
Naturally, the community has developed creative solutions to extract and edit NotebookLM slide content. Here's an honest look at the top 3 alternatives.
Method | Works For | Editable Text | Preserves Layout | Effort |
PDF → PowerPoint converters (Adobe, Smallpdf, etc.) | Basic content extraction | Partial | Poor | High |
Canva import + Magic Studio | Visual mockups, simple decks | With Pro plan | Moderate | High |
Full manual + AI editing | Full control | Preserved | Low |
The PDF → PowerPoint Converter
Most online PDF-to-PPT converters simply don't work well with NotebookLM exports. Because each slide is a rendered image, these tools either (a) keep the content as flat images inside PowerPoint slides - meaning nothing is editable or (b) attempt OCR text extraction and scramble the entire layout in the process. Either way, you end up with significant cleanup work.
The Canva Approach
Canva can import NotebookLM PDFs, and tools like Magic Grab allow you to extract individual elements from images. However, this requires a Canva Pro subscription, works inconsistently on complex layouts, often mismatches fonts, and still requires substantial manual work to reconstruct each slide faithfully. It's a viable option for simple decks, but not a scalable workflow for professionals.
Alai’s NotebookLM Slide Editor
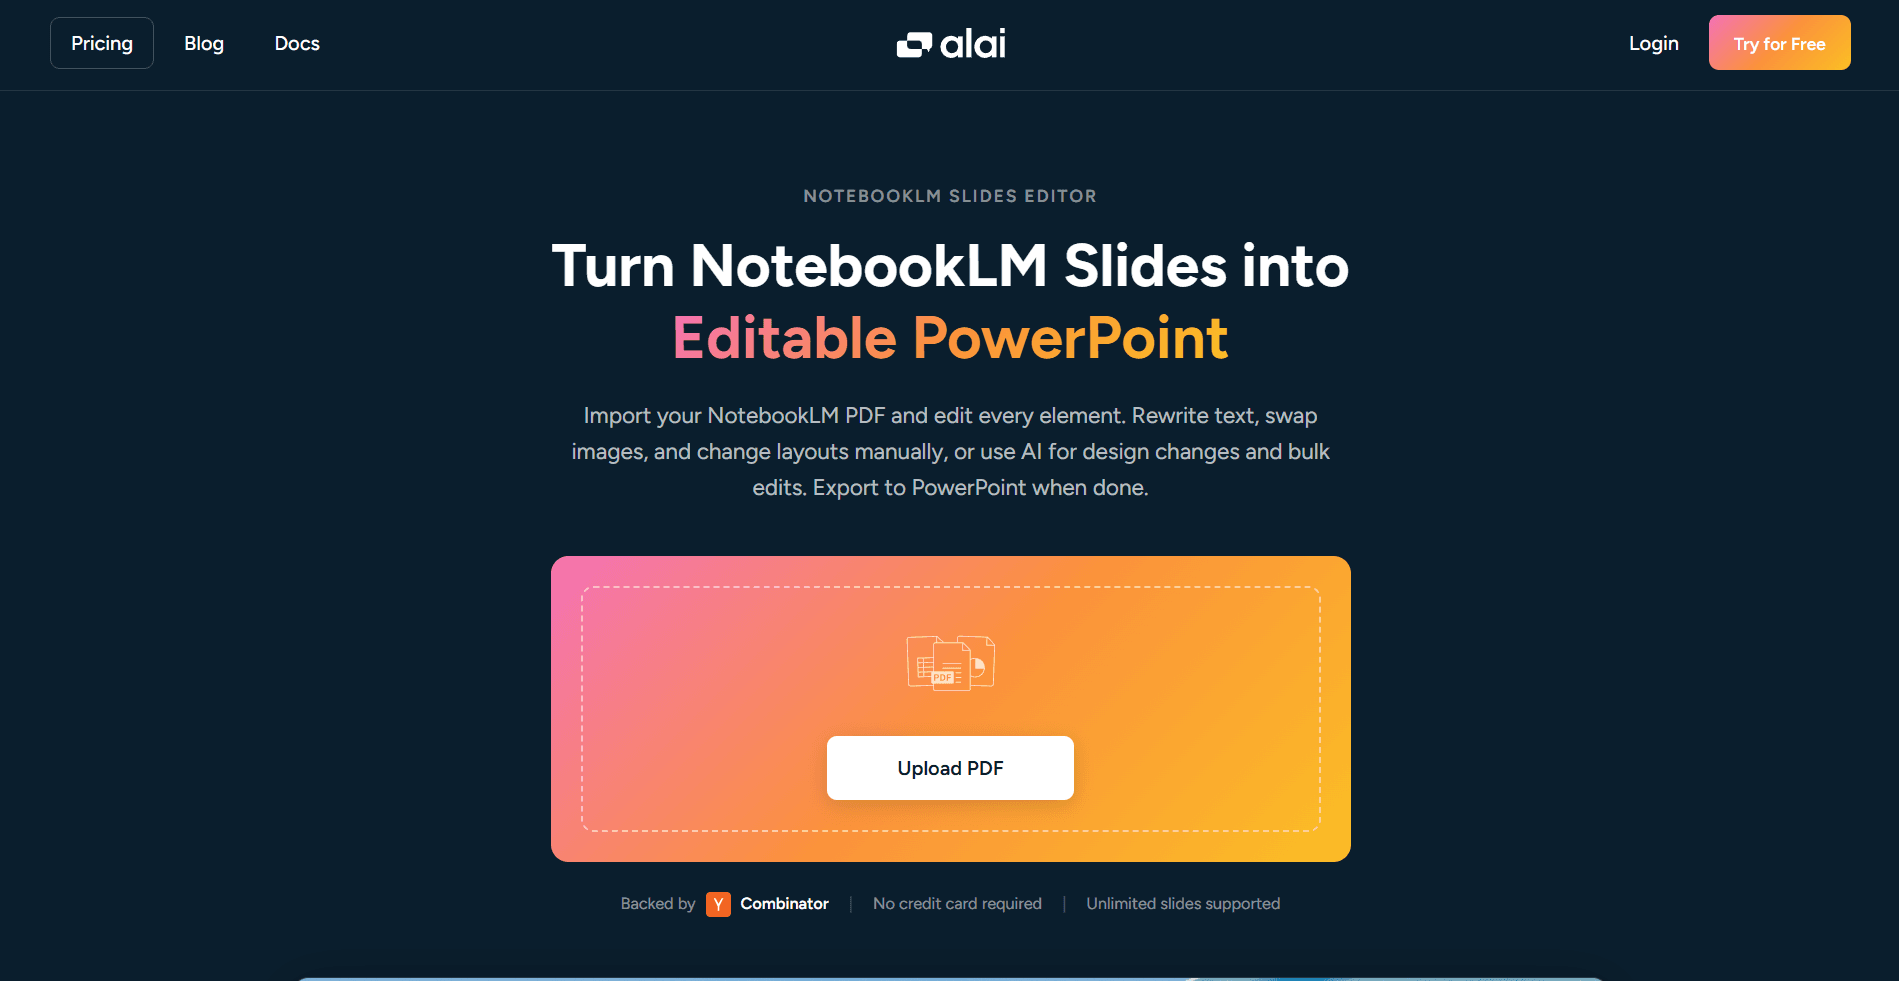
Alai’s NotebookLM Slide Editor bridges the gap between NotebookLM's AI-powered generation and the manual control you need to finish a deck properly.
The concept is simple but powerful: instead of trying to edit inside NotebookLM (which doesn't support it) or fumbling with generic PDF converters (which break layouts), you export your NotebookLM deck, upload it to Alai, and get a faithful, fully interactive version of your slides that you can edit element by element - manually or with AI.
How Alai’s NotebookLM editor is different: Alai's editor reconstructs slide elements as real, selectable objects, not flat images. That means you can click a text box and change a single word, move an icon, resize an image, or swap a color all without touching the AI or waiting for a full deck regeneration.
And crucially: manual edits don't consume credits. You can iterate on design and layout as much as you need without worrying about usage limits. Once you're happy with the structure, you can also use Alai's beautify feature to polish the overall visual design before exporting.
Once your slides are in Alai, you have two distinct ways to work on them. Let me show you which to reach for and when.
Manual Edits vs. AI Edits: How Alai's NotebookLM Slide Editor Works
Once your NotebookLM slides are in Alai, you have two distinct editing modes.
Manual Editing: Full Direct Control
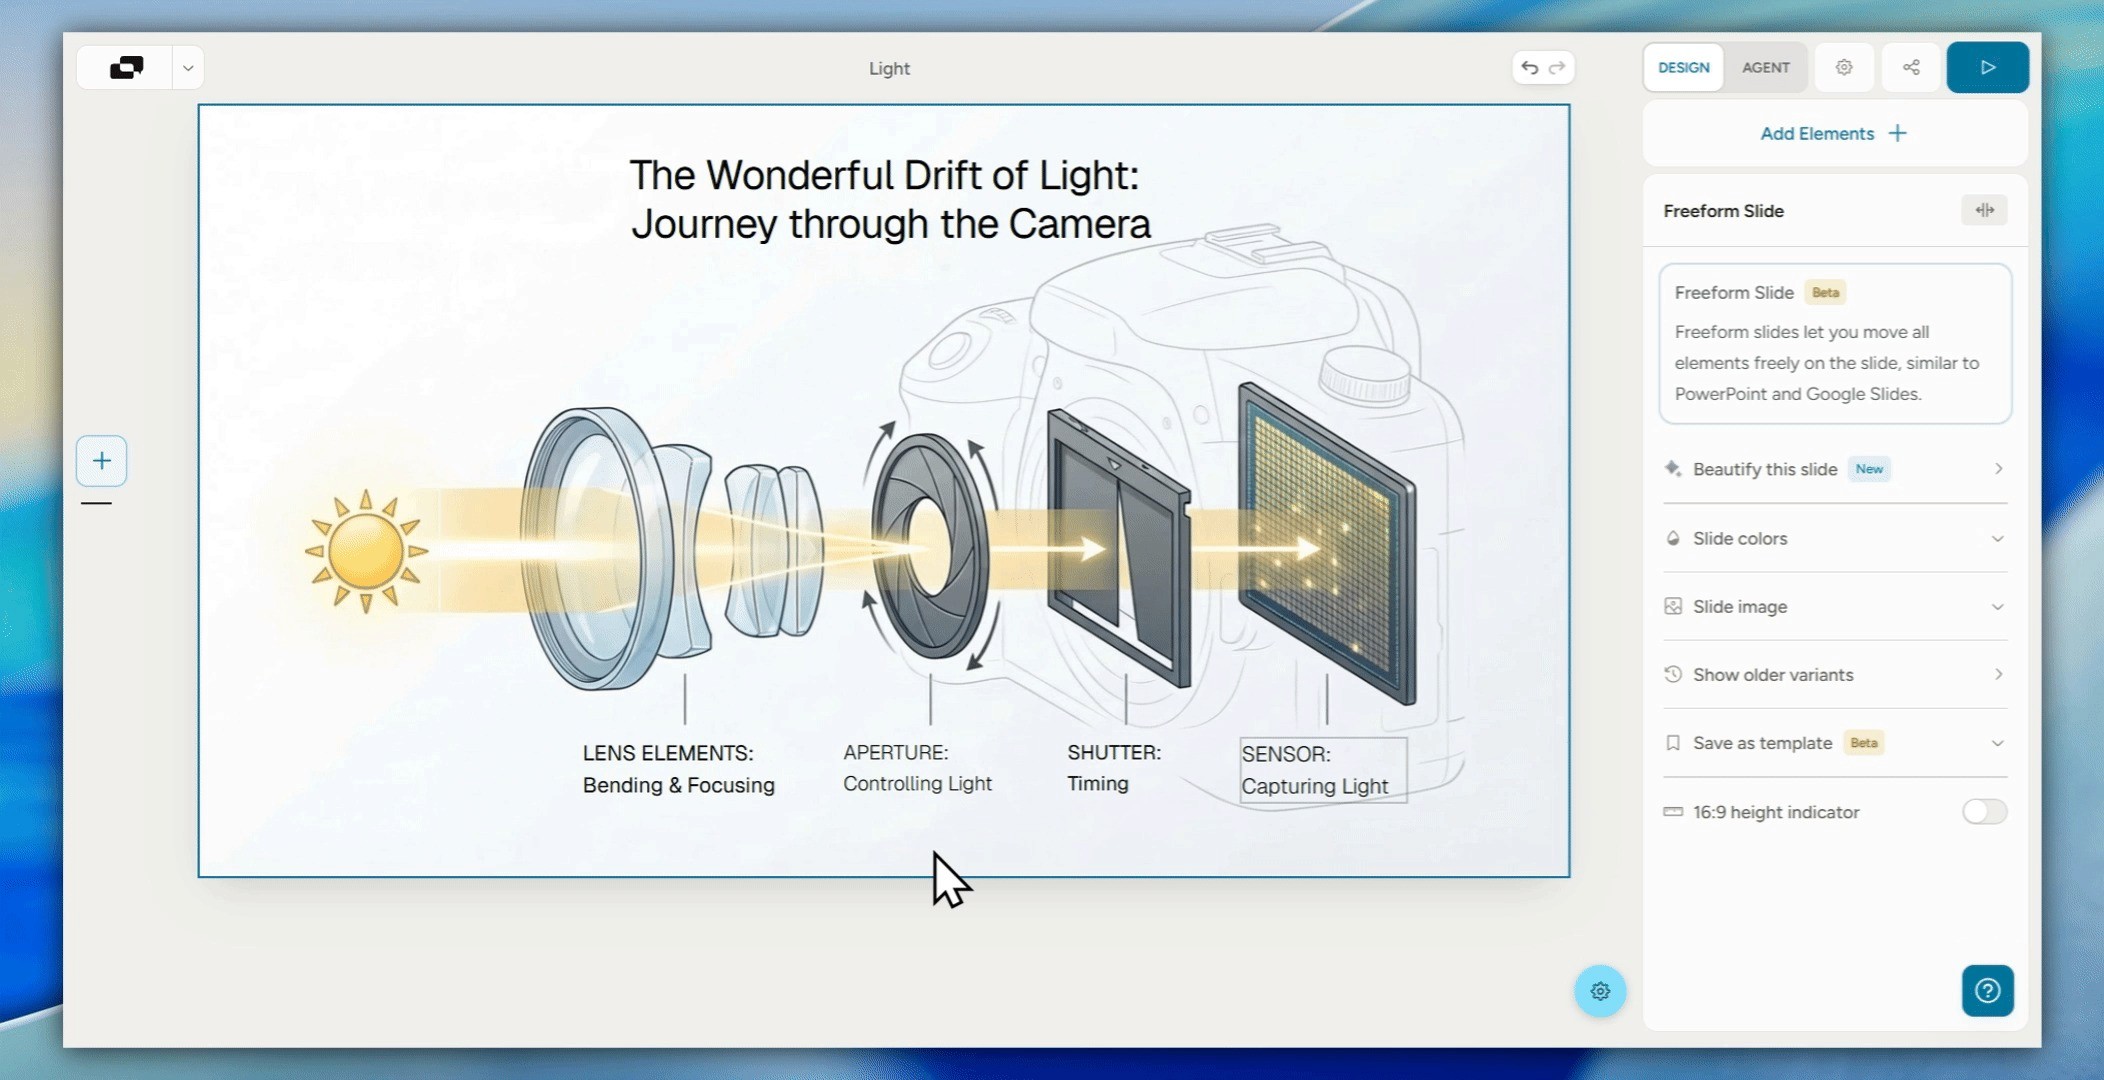
Manual editing in Alai converts image slides to freeform ones, this allows users to:
Select a text block → change font, size, color, or alignment
Click an image or icon → resize, reposition, or replace it
Adjust spacing and padding between elements
Add new elements - text boxes or images
Modify background colors or gradients per slide
Manual edits are instant, they don't regenerate anything, and they consume no credits. This is the right mode for fine-tuning typography, fixing small content errors, applying brand guidelines, or making layout adjustments. All you need to do once your deck is imported is:
Step 1: Choose the ‘Edit Manually’ option and make the slide editable
Step 2: Make whatever edits you need directly to the slide
Step 3 (optional): ‘Beautify’ the slide again to fix any errors in formatting
AI-Assisted Editing:
Alai also offers AI-based editing that can be done in two ways while maintaining theme context:
Via general instructions given to AI such as:
"Rewrite the slide header to be punchier and shorter"
"Make the tone throughout more formal"
"Add speaker notes to the slide”
Via annotations: Click on the area/text where you want an edit and describe the change you want.
Step-by-Step: How to Edit NotebookLM Slides and Export as PPTX
Here's the complete workflow from NotebookLM generation to a fully polished, export-ready presentation.
Step 1: Generate your deck in NotebookLM. Upload your sources and use the Studio panel to create your slide deck. Use the AI prompt interface to get the structure right before exporting.
Step 2: Export as PDF from NotebookLM. Click the three-dot menu on your slide deck and select "Download PDF Document (.pdf)." This preserves the highest visual fidelity for the next step.
Step 3: Upload to Alai's NotebookLM Slide Editor. Go to app.getalai.com/notebooklm and upload your PDF.
Step 4: Edit any element directly or use AI:
General instructions: Change the overall slide (e.g., "make it more visual")
Point-specific instructions: Make targeted AI edits on specific elements, images, or text
Manually editing: Click 'Edit Manually' to convert the image slides to freeform slides, giving you full control to rewrite text, reposition elements, adjust padding, change font size and more.
Step 5: Export as editable PPTX. When you're happy with the result, export your deck as a fully editable PowerPoint file.
What the exported PPTX file contains:
Real, selectable text boxes with preserved font styling
Independently moveable images and graphic elements
Proper slide structure compatible with PowerPoint.
NotebookLM Slides: Frequently Asked Questions
Can you edit NotebookLM slides directly inside NotebookLM?
Not in the traditional sense. NotebookLM's new prompt-based revisions feature lets you give the AI instructions to modify individual slides, but it still regenerates the deck rather than letting you click and edit elements directly. You cannot select a text box, move an icon, or change a font without going through the AI.
Does NotebookLM export editable PowerPoint files?
NotebookLM recently added a direct PowerPoint (.pptx) export option. However, the exported file still contains slides rendered as image layers rather than structured, editable objects. Most text and graphic elements cannot be selected or modified in PowerPoint after export.
What's the best way to edit NotebookLM slides manually?
The most reliable workflow is: export your NotebookLM deck as a PDF, upload it to Alai's NotebookLM Slide Editor, edit any element directly in Alai's interface, and export as a fully editable PPTX. This preserves the original design while giving you complete manual control.
Is there a way to edit NotebookLM slides without consuming AI credits?
Yes, in Alai's NotebookLM editor, manual edits (clicking and directly modifying elements) do not consume any credits. Only AI-assisted edits count against usage. This means you can iterate on layout, typography, and design as much as you need without worrying about limits.
Can I apply my company's brand fonts and colors to NotebookLM slides?
Not inside NotebookLM itself. The AI controls all visual styling during generation. However, once you bring your deck into Alai's editor, you can change fonts, colours, and design elements freely. making it straightforward to align the presentation with your brand guidelines before exporting.
What is Nano Banana Pro and why does it matter for NotebookLM slides?
Nano Banana Pro is Google's Gemini 3 Pro Image model, launched in November 2025. It's the image generation engine powering NotebookLM's slide visuals, and it's specifically built to render legible text inside images — which most AI image models fail at. This is why NotebookLM slides tend to look crisp and professionally styled. The limitation is that Nano Banana Pro outputs images, not editable slide layers, which is why third-party editing tools are necessary for manual control.
Can I add new slides to a NotebookLM deck?
As of the latest update, adding or removing slides is not supported within NotebookLM's revision interface - you can only modify existing ones. To add new slides, you would need to regenerate the full deck with new instructions or bring your deck into Alai where you can add slides manually.
Is NotebookLM's slide feature free?
The slide deck feature is available to all NotebookLM users, including free accounts. However, free users have quota limits on how many decks and revisions they can generate, and their exported slides include a Nano Banana Pro watermark. Watermark removal and priority access to longer decks require a Google AI Pro or Ultra subscription.
How is Alai different from Gamma for editing NotebookLM slides?
Gamma is a strong standalone presentation builder but doesn't ingest NotebookLM exports - you'd need to rebuild your deck inside Gamma from scratch. Alai's NotebookLM editor is specifically designed to take your existing NotebookLM PDF output and reconstruct it as a fully editable deck, preserving the original design while giving you element-level control. If you've already generated a deck in NotebookLM and want to edit it rather than rebuild it, Alai is the more direct path.
The Bottom Line on Editing NotebookLM Slides
NotebookLM is genuinely excellent at the part most people struggle with most: turning raw source material into a structured, professional-looking presentation content. That's a hard problem and it solves it well.
The editing side is where it hands the baton off. Prompt-based revisions, PPTX export, Gemini 3.1 Pro - these are real improvements, and Google is clearly iterating quickly. But the underlying architecture hasn't changed. The slides are still images. The elements are still locked. And for any professional who needs to apply brand standards, make precise layout adjustments, or hand off a file the whole team can work in, the AI-only editing loop isn't enough.
The workflow that closes that gap is straightforward: generate in NotebookLM, export the PDF, bring it into Alai's NotebookLM Slide Editor, and finish the deck with full manual and AI control. You keep everything NotebookLM is good at and gain everything it can't give you.
If you're also interested in how Nano Banana Pro - the model powering NotebookLM's slide visuals can be used outside NotebookLM for presentation creation, Alai's complete guide to using Nano Banana Pro for presentations covers the full landscape, including which tools pair it with real editing capabilities and which ones leave you in the same locked-image situation.
PAGES
Compare Tools
resources
